
Gingerbread Cookie Cups turn the warm, spiced flavors of classic gingerbread into miniature desserts. Each cookie cup has a tender, slightly chewy center, lightly crisp edges, and a rich molasses flavor complemented by ginger, cinnamon, and cloves. A swirl of vanilla cream cheese frosting adds a smooth, tangy contrast to the sweet, spiced cookie.
These festive treats are baked in a mini muffin pan, making them convenient for Christmas parties, holiday cookie trays, and homemade gifts. The dough needs just 30 minutes of chilling, and the unfilled cookie cups can be prepared ahead of time.
Why This Recipe Works
- Molasses creates classic gingerbread flavor. Its deep sweetness gives the cookies their characteristic color and complements the warm spices.
- Chilling helps the dough hold its shape. Firm dough is easier to press into the muffin pan and less likely to spread excessively during baking.
- A mini muffin pan creates uniform cups. Each portion bakes into a small, sturdy shell that can hold a generous swirl of frosting.
- Reshaping the centers while warm creates room for filling. Gently pressing the freshly baked cookies produces defined cavities without cracking the cooled crusts.
- Cream cheese frosting balances the spices. Its tangy flavor and smooth texture contrast with the sweet molasses cookies.
Equipment Needed
- 24-cup nonstick mini muffin pan
- Electric hand mixer or stand mixer fitted with a paddle attachment
- Large mixing bowl
- Medium mixing bowl
- Rubber spatula
- Small cookie scoop
- Rounded teaspoon or the end of a small wooden spoon
- Wire cooling rack
- Piping bag with a large star tip, or a small offset spatula
Ingredients List
For the Gingerbread Cookie Cups
- ½ cup (113 g) unsalted butter, softened
- ½ cup (110 g) packed dark brown sugar
- ¼ cup (85 g) unsulphured molasses, not blackstrap
- 1 large egg (about 50 g without the shell), at room temperature
- 1 teaspoon (5 mL) pure vanilla extract
- 2 cups (250 g) all-purpose flour, spooned and leveled
- ½ teaspoon (2.5 g) baking soda
- ¼ teaspoon (1.5 g) fine salt
- 1½ teaspoons (about 3 g) ground ginger
- 1 teaspoon (about 2.5 g) ground cinnamon
- ⅛ teaspoon (about 0.25 g) ground cloves
- 1 teaspoon (5 mL) neutral vegetable oil, for greasing the pan
For the Vanilla Cream Cheese Frosting
- 6 ounces (170 g) full-fat block cream cheese, softened
- 2 tablespoons (28 g) unsalted butter, softened
- ¾ cup (90 g) powdered sugar, sifted
- 1 teaspoon (5 mL) pure vanilla extract
- 1–2 teaspoons (5–10 mL) whole milk, if needed
Optional Garnish
- ¼ teaspoon (about 0.5 g) ground cinnamon, optional, for dusting
- 1 tablespoon (about 10 g) finely chopped crystallized ginger, optional
Ingredient Notes and Substitutions
- Molasses: Unsulphured molasses gives these cookie cups their deep color, moisture, and distinctive gingerbread flavor. Use regular or dark molasses rather than blackstrap, which can taste excessively bitter. Maple syrup and honey are not reliable direct substitutes because they change both the flavor and moisture balance.
- Dark Brown Sugar: Dark brown sugar reinforces the molasses flavor and helps keep the cookie centers tender. Light brown sugar can replace it in the same amount, although the cookies will have a slightly lighter color and milder caramel flavor.
- Ground Ginger: Ground ginger provides the warm, slightly peppery flavor associated with gingerbread. Use fresh, aromatic ground ginger rather than a jar that has been open for several years. Freshly grated ginger is not a direct substitute because it adds moisture and produces a different flavor.
- Cream Cheese: Full-fat block cream cheese gives the frosting its thick consistency and gentle tang. Neufchâtel cheese can be substituted, although the frosting may be slightly softer. Avoid whipped cream cheese from a tub, which can make the filling too loose to pipe neatly.
- All-Purpose Flour: All-purpose flour provides the structure needed for the cookie cups to support their frosting. Measure it carefully because excess flour can produce dry, crumbly shells. A one-to-one gluten-free baking flour blend may work, but the cups may be more fragile and could require adjustments to the chilling time.
Step-by-Step Instructions
1. Cream the Butter and Brown Sugar
In a large mixing bowl, beat the softened butter and dark brown sugar with an electric mixer on medium speed for approximately 2–3 minutes.
The mixture should look smooth, creamy, and slightly lighter in color. Scrape down the sides of the bowl as needed to incorporate all the butter and sugar.
2. Add the Molasses and Wet Ingredients
Add the molasses, egg, and vanilla extract.
Beat on medium-low speed until thoroughly combined. The mixture should be thick, glossy, and dark brown.
Scrape the bowl again to make sure no streaks of molasses remain.
3. Combine the Dry Ingredients
In a separate medium bowl, whisk together the flour, baking soda, fine salt, ground ginger, cinnamon, and cloves.
Mix thoroughly so the spices and baking soda are evenly distributed throughout the flour.
4. Make the Gingerbread Dough
Add the dry ingredients to the butter mixture in two additions, mixing on low speed after each addition.
Stop mixing as soon as no dry flour remains. The dough should be soft, thick, and slightly sticky but cohesive.
Avoid adding unnecessary flour. The dough will become easier to handle after chilling.
5. Chill the Dough
Cover the mixing bowl tightly and refrigerate the dough for 30 minutes.
It should become noticeably firmer and easy to portion without sticking excessively to your hands.
If the dough remains very soft, refrigerate it for another 10–15 minutes before shaping.
6. Preheat the Oven and Prepare the Pan
Near the end of the chilling time, preheat the oven to 350°F (175°C).
Lightly grease all 24 cavities of a nonstick mini muffin pan with the vegetable oil.
Pay particular attention to the sides of the cavities, since the cookie cups need to release cleanly after baking.
7. Portion the Dough
Divide the chilled dough into 24 equal portions, approximately 1 heaping tablespoon or 26 g each.
Roll each portion gently into a ball and place one in each prepared muffin cavity.
Keep the portions as uniform as possible so all the cookie cups bake at approximately the same rate.
8. Shape the Cookie Cups
Use your thumb or the rounded back of a teaspoon to press an indentation into the center of each dough ball.
Gently push the dough across the bottom and partway up the sides of the muffin cavity, creating a small cup with relatively even walls.
Do not make the bottoms excessively thin. The centers will puff slightly during baking and can be reshaped afterward.
9. Bake the Cookie Cups
Place the mini muffin pan on the center oven rack.
Bake for approximately 13–15 minutes, until the edges look set and the tops are matte rather than wet.
The cookies will already be dark because of the molasses, so judge doneness by their texture rather than waiting for a deep golden color.
Avoid overbaking, which can make the cups hard and difficult to remove from the pan.
10. Reshape the Centers
Remove the muffin pan from the oven.
While the cookies are still hot, gently press the center of each cup with the rounded back of a teaspoon or the end of a small wooden spoon.
The centers should give way easily, creating a defined cavity for the frosting. Press gently rather than forcing the spoon through the bottom.
If a small crack appears along an edge, carefully press it back together while the cookie is still warm.
11. Cool the Cookie Cups
Allow the cookies to cool in the muffin pan for approximately 10 minutes.
Gently twist each cup to release it, then lift it out and transfer it to a wire rack. If necessary, loosen the edges carefully with a thin, blunt knife.
Let the cups cool completely for another 20 minutes before adding the frosting.
The cookie shells should feel firm enough to handle without breaking.
12. Make the Vanilla Cream Cheese Frosting
While the cookie cups finish cooling, beat the softened cream cheese and butter together in a medium bowl until smooth and creamy.
Add the sifted powdered sugar and vanilla extract. Beat on low speed until incorporated, then increase to medium speed and mix until light and smooth.
The frosting should be thick enough to hold its shape when piped. If it is too stiff, add the milk 1 teaspoon at a time, using no more than the listed 2 teaspoons.
13. Fill the Cookie Cups
Transfer the frosting to a piping bag fitted with a large star tip.
Pipe a small swirl into the center of each completely cooled gingerbread cookie cup, dividing the frosting evenly among all 24 cookies.
Alternatively, spoon the frosting into each cavity and create a gentle swirl with a small offset spatula.
Avoid overfilling the cups if you plan to transport or stack them.
14. Garnish and Chill
If desired, finish the cookie cups with a light dusting of the optional cinnamon or a few pieces of finely chopped crystallized ginger.
Arrange them in a single layer on a covered tray and refrigerate for approximately 20 minutes, until the frosting firms up.
Serve slightly chilled or allow them to stand at room temperature for 10–15 minutes before serving.
Storage, Freezing, and Make-Ahead Instructions
- Refrigeration: Store filled Gingerbread Cookie Cups in an airtight container in the refrigerator for up to 4 days. Arrange them in a single layer to protect the frosting. If you need to transport them, chill them until the frosting is firm before transferring them to a covered container. For a softer cookie texture, allow the cups to stand at room temperature for approximately 10–15 minutes before serving.
- Room-Temperature Storage: Unfilled cookie cups can be stored in an airtight container at room temperature for up to 3 days. Keep them in a cool, dry location and separate layers with parchment paper to prevent damage. Once filled with cream cheese frosting, the cookies must be refrigerated. Do not leave them at room temperature for more than 2 hours.
- Freezing: For the best texture and appearance, freeze the cookie cups before filling them. Allow the baked cups to cool completely, then arrange them in a freezer-safe container with parchment paper between layers. Freeze for up to 2 months. Thaw in their covered container at room temperature before adding freshly prepared cream cheese frosting. Freezing the filled cookies is possible, but the frosting may lose some of its smooth texture after thawing.
- Make-Ahead Preparation: The gingerbread dough can be prepared up to 3 days in advance and stored tightly covered in the refrigerator. You can also bake the unfilled cookie cups up to 2 days before serving and store them in an airtight container at room temperature. Prepare the cream cheese frosting up to 2 days ahead and refrigerate it separately. Allow it to soften slightly, then beat briefly until smooth before piping. For the neatest presentation, fill and garnish the cookie cups on the day you plan to serve them.
FAQ
Can I make Gingerbread Cookie Cups ahead of time?
Yes. Bake the cookie cups up to 2 days ahead and store them unfilled in an airtight container. Prepare the frosting separately, then fill and garnish the cups closer to serving time. This helps the cookie shells retain their lightly crisp edges.
Why did my gingerbread cookie cups lose their shape?
The dough may have been too warm, or the centers may have puffed during baking. Chill the dough before shaping and gently press the cavities back into place immediately after removing the cookies from the oven.
Can I make these cookies without cream cheese frosting?
Yes. A thick vanilla buttercream or chocolate ganache can replace the cream cheese frosting. Buttercream will produce a sweeter filling, while chocolate ganache will add richness and a more pronounced chocolate flavor.
Can I use a regular muffin pan instead of a mini muffin pan?
Yes, but the recipe will make approximately 12 larger cookie cups. Divide the dough evenly among the cavities, press it into cups, and increase the baking time as needed. The larger cups will require more filling per cookie if you want them filled to the top.
How do I remove cookie cups without breaking them?
Lightly grease the pan before adding the dough, and let the baked cups rest for approximately 10 minutes before removing them. Gently twist each cookie to release it. If an edge sticks, carefully loosen it with a thin, blunt knife rather than pulling the cookie straight out.
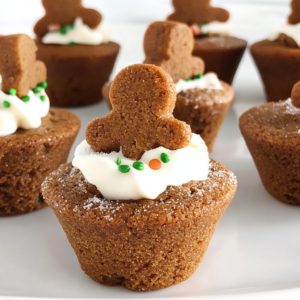
Gingerbread Cookie Cups
Ingredients
For the Gingerbread Cookie Cups
- 1/2 cup (113 g) unsalted butter softened
- 1/2 cup (110 g) packed dark brown sugar
- 1/4 cup (85 g) unsulphured molasses not blackstrap
- 1 large egg (about 50 g without the shell) at room temperature
- 1 teaspoon (5 mL) pure vanilla extract
- 2 cups (250 g) all-purpose flour spooned and leveled
- 1/2 teaspoon (2.5 g) baking soda
- 1/4 teaspoon (1.5 g) fine salt
- 1 1/2 teaspoons (about 3 g) ground ginger
- 1 teaspoon (about 2.5 g) ground cinnamon
- 1/8 teaspoon (about 0.25 g) ground cloves
- 1 teaspoon (5 mL) neutral vegetable oil for greasing the pan
For the Vanilla Cream Cheese Frosting
- 6 ounces (170 g) full-fat block cream cheese softened
- 2 tablespoons (28 g) unsalted butter softened
- 3/4 cup (90 g) powdered sugar sifted
- 1 teaspoon (5 mL) pure vanilla extract
- 1–2 teaspoons (5–10 mL) whole milk if needed
Optional Garnish
- 1/4 teaspoon (about 0.5 g) ground cinnamon optional, for dusting
- 1 tablespoon (about 10 g) finely chopped crystallized ginger optional
Instructions
Method
- In a large mixing bowl, beat the softened butter and dark brown sugar with an electric mixer on medium speed for approximately 2–3 minutes. The mixture should look smooth, creamy, and slightly lighter in color. Scrape down the sides of the bowl as needed to incorporate all the butter and sugar.
- Add the molasses, egg, and vanilla extract: Beat on medium-low speed until thoroughly combined. The mixture should be thick, glossy, and dark brown. Scrape the bowl again to make sure no streaks of molasses remain.
- In a separate medium bowl, whisk together the flour, baking soda, fine salt, ground ginger, cinnamon, and cloves. Mix thoroughly so the spices and baking soda are evenly distributed throughout the flour.
- Add the dry ingredients to the butter mixture in two additions, mixing on low speed after each addition. Stop mixing as soon as no dry flour remains. The dough should be soft, thick, and slightly sticky but cohesive. Avoid adding unnecessary flour. The dough will become easier to handle after chilling.
- Cover the mixing bowl tightly and refrigerate the dough for 30 minutes. It should become noticeably firmer and easy to portion without sticking excessively to your hands. If the dough remains very soft, refrigerate it for another 10–15 minutes before shaping.
- Near the end of the chilling time, preheat the oven to 350°F (175°C). Lightly grease all 24 cavities of a nonstick mini muffin pan with the vegetable oil. Pay particular attention to the sides of the cavities, since the cookie cups need to release cleanly after baking.
- Divide the chilled dough into 24 equal portions, approximately 1 heaping tablespoon or 26 g each. Roll each portion gently into a ball and place one in each prepared muffin cavity. Keep the portions as uniform as possible so all the cookie cups bake at approximately the same rate.
- Use your thumb or the rounded back of a teaspoon to press an indentation into the center of each dough ball. Gently push the dough across the bottom and partway up the sides of the muffin cavity, creating a small cup with relatively even walls. Do not make the bottoms excessively thin. The centers will puff slightly during baking and can be reshaped afterward.
- Place the mini muffin pan on the center oven rack. Bake for approximately 13–15 minutes, until the edges look set and the tops are matte rather than wet. The cookies will already be dark because of the molasses, so judge doneness by their texture rather than waiting for a deep golden color. Avoid overbaking, which can make the cups hard and difficult to remove from the pan.
- Remove the muffin pan from the oven: While the cookies are still hot, gently press the center of each cup with the rounded back of a teaspoon or the end of a small wooden spoon. The centers should give way easily, creating a defined cavity for the frosting. Press gently rather than forcing the spoon through the bottom. If a small crack appears along an edge, carefully press it back together while the cookie is still warm.
- Allow the cookies to cool in the muffin pan for approximately 10 minutes. Gently twist each cup to release it, then lift it out and transfer it to a wire rack. If necessary, loosen the edges carefully with a thin, blunt knife. Let the cups cool completely for another 20 minutes before adding the frosting. The cookie shells should feel firm enough to handle without breaking.
- While the cookie cups finish cooling, beat the softened cream cheese and butter together in a medium bowl until smooth and creamy. Add the sifted powdered sugar and vanilla extract. Beat on low speed until incorporated, then increase to medium speed and mix until light and smooth. The frosting should be thick enough to hold its shape when piped. If it is too stiff, add the milk 1 teaspoon at a time, using no more than the listed 2 teaspoons.
- Transfer the frosting to a piping bag fitted with a large star tip. Pipe a small swirl into the center of each completely cooled gingerbread cookie cup, dividing the frosting evenly among all 24 cookies. Alternatively, spoon the frosting into each cavity and create a gentle swirl with a small offset spatula. Avoid overfilling the cups if you plan to transport or stack them.
- If desired, finish the cookie cups with a light dusting of the optional cinnamon or a few pieces of finely chopped crystallized ginger. Arrange them in a single layer on a covered tray and refrigerate for approximately 20 minutes, until the frosting firms up. Serve slightly chilled or allow them to stand at room temperature for 10–15 minutes before serving.


